Accurate torque measurements are crucial in maintaining the integrity and quality of your products, and that’s where torque testers come in. Torque tester calibration isn’t just a technical obligation — it’s your gateway to ensuring your torque testers deliver reliable results every time. Understanding how to calibrate a torque tester can make all the difference in your operation’s efficiency. Ready to tighten up those torque readings? Let’s get started.

The Importance of Torque Tester Calibration
Proper bottle cap torque tester calibration keeps your capping process balanced — avoiding seals that are too loose or too tight.
When your torque testers are dialed in, they reliably protect your product integrity. This ensures every bottle meets your brand promise, keeping customers happy and avoiding costly recalls. Calibration ensures every product ships out with the consistent quality your customers expect.
DIY Torque Tester Calibration Kits
When it comes to ensuring your torque testers are performing at their best, SecurePak’s torque tester calibration kits have you covered. Each kit includes all the essentials. To make the calibration process foolproof, detailed instructions and ASTM standards are included, guiding you every step of the way toward achieving accurate and reliable torque measurements.

Step-by-Step Calibration Guide
Ready to get hands-on and fine-tune your bottle cap torque testers for peak performance? Calibrating these devices doesn’t need to be a daunting task if you follow the proper steps. Let’s break down the process into a straightforward, step-by-step guide to ensure your equipment always delivers accurate results. Just to note: while these steps will help you calibrate most SecurePak torque testers, they don’t apply to the TorqTraQ® hand-held digital torque tester. The TorqTraQ® requires special calibration setup and software and must be calibrated by SecurePak.
1. Preparation
Before discussing how to calibrate a torque tester, let’s talk about preparation. Gather all necessary tools and documentation — your calibration kit, the tester’s manual, and any other relevant paperwork. A well-prepared workspace is half the battle won. Make sure your torque tester is clean and unobstructed. Dust, grime, or any debris can interfere with the accuracy of your readings. A clear and focused setup sets the stage for a smooth calibration.
2. Initial Checks
As you begin calibrating, it’s crucial to perform some initial checks to ensure everything is in tip-top shape. Start by inspecting your torque tester for any visible signs of wear or damage. Cracks, loose components, or other physical defects can affect performance and accuracy. Next, check the battery or power source. Ensure it’s fully charged or properly connected — nothing is more frustrating than your device conking out mid-calibration. These simple checks help prevent interruptions and ensure your torque tester is ready to deliver consistent and precise readings.
3. Calibration Setup
Setting up your torque tester correctly is the foundation of a successful calibration. Begin by placing the tester on a stable, flat surface to avoid any wobbling or movement that could skew your results. Stability is key here; it ensures the accuracy and repeatability of your measurements.
Once your device is securely stationed, it’s time to focus on the hardware. Attach the appropriate chuck or adapter designed for the specific cap type you’re working with. Using the correct adapter guarantees that the torque is applied evenly and accurately, mirroring the exact conditions your bottled products will encounter on the production line. This precise setup is essential for achieving reliable calibration results.
4. Calibration Process
With your torque tester set up, it’s time to calibrate. Make sure you have the appropriate SecurePak calibration kit specifically designed for your model. Carefully follow the included instructions.
As you work through this process, adjust the settings methodically, aligning them with the required calibration standards. This attention to detail ensures your torque tester remains a reliable tool in your quality control arsenal, maintaining the accuracy and consistency your operations depend on.
5. Verification
Once you’ve completed the calibration steps, verify that everything is functioning perfectly. Test several samples to ensure your torque tester delivers consistent, accurate readings. Consistency across multiple tests indicates that your calibration is spot on.
If you notice any discrepancies or variations in the measurements, be sure to re-calibrate. Every reading should reflect the true torque applied, safeguarding the quality and integrity of your bottled products. This verification step is your assurance that the calibration has been successful and that your operation continues to meet your high standards.
6. Record-Keeping
Once your torque tester is calibrated and verified, don’t forget to document everything. Keep a detailed record of the calibration results and any tweaks you made along the way. These records are like a maintenance diary, crucial for future troubleshooting and audits.
It’s also wise to set up a regular calibration schedule that fits your business needs. This practice can help you spot potential problems early, keep your equipment in excellent shape, and guarantee that your torque measurements stay accurate. Routine documentation and scheduling are key pillars of a solid quality assurance program.
Tips for Optimal Bottle Cap Torque Tester Calibration
To keep your torque testers performing at their peak, consider these best practices for maintaining accuracy:
- Store your devices and calibration kits in a clean, dry environment to protect them from moisture and dust, which can affect their performance
- Regularly inspect and clean all components to prevent buildup that can lead to errors
- Train personnel thoroughly on calibration procedures to ensure consistency and accuracy in their execution
Common challenges during bottle cap torque tester calibration include inaccurate readings due to improper setup or outdated equipment. You can overcome these by using a stable setup and up-to-date calibration tools from SecurePak. Another frequent issue can be operator error; using the clear, guided instructions from SecurePak’s manuals can help mitigate this. Addressing these challenges ensures the longevity and reliability of your torque testing equipment.
An Alternative to DIY Torque Tester Calibration
After reading our torque tester calibration guide, you may decide you don’t want to take on the task. That’s OK. SecurePak has your back with professional calibration services. If you’d rather leave it to the experts, our facility in Millbury, Ohio, is equipped to handle all your calibration and repair needs. Simply contact us to arrange service.
Plus, to ensure your operations remain uninterrupted, SecurePak offers a convenient loaner program. For a fee, we’ll send a temporary replacement tester right to your doorstep so you can keep things running smoothly while your equipment is being calibrated. It’s all about keeping you operational with minimal hassle.
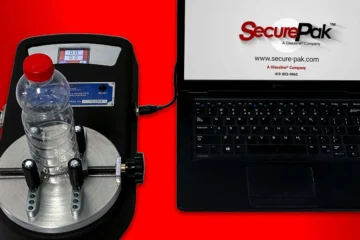
Digital Torque Tester Demonstration
See our digital torque tester in action and witness just how easy SecurePak products are to use.
Frequently Asked Questions About How to Calibrate a Torque Tester
As a leading supplier of bottle cap torque testers, SecurePak fields many questions about how to calibrate a torque tester. Here are some common questions we receive.
How often should I calibrate my torque tester?
The frequency of calibration largely depends on the specific requirements of your industry and the volume of usage. However, as a general rule, it’s recommended to calibrate torque testers every six to 12 months to ensure optimal performance and accuracy. High-usage environments or operations with stringent compliance standards might require more frequent calibration.
What should I do if my torque tester shows inconsistent readings?
Inconsistent readings can result from several factors, including improper setup, obstructions, or wear and tear on the device. First, ensure the tester is clean, correctly assembled, and placed on a stable surface. If the issue persists, it might be time for recalibration or a professional inspection to address any underlying mechanical problems.
How long do SecurePak’s torque tester calibration services take?
We work quickly and efficiently to get your bottle cap torque tester back to you as soon as possible. If repairs are required, the process could take four to six weeks, depending on demand.
Trust SecurePak for Your Bottle Cap Torque Tester Calibration Needs
Now that we’ve reviewed how to calibrate a bottle cap torque tester, you’re ready for the next step. Partner with SecurePak for top-tier calibration solutions. Whether you want the convenience of professional services or prefer a hands-on approach with our comprehensive calibration kits, SecurePak is your trusted ally. Contact us today, and let’s keep your operations running flawlessly.